Food and Garden Dailies started as a way to record my family's favorite recipes. It has come in handy many times when I'm asked for a recipe. I simply email a link to the blog! But I couldn't just stick to recipes. The kitchen is tied to the garden in so many ways...and so I let you into my ever changing garden as well.

If you're interested in my all-time favorite recipes, check out this post first: My Favorite Recipes

Showing posts with label freezer meals. Show all posts

Thursday, July 19, 2012

My Favorite Recipes

Pin It These are my tried and true favorites...the recipes I turn to when company is coming and I need a "sure thing" on the table.  These are the recipes that have been made over and over...some I've made for over 20 years. Try a few...and let me know what you think!

Chicken:  Barbecued Herb-Mustard Chicken


In the late 1980s my mother in law introduced me to this recipe from Sunset magazine.  She made it frequently for family get-togethers and Brian and I continue to make it on a regular basis. In fact, when I make it, I quadruple the recipe and fill up the freezer for easy-to-make meals at a later date.

Something else I should mention, is that it's worth trying even if you don't like mustard.  I HATE mustard.  Hate it. I don't even scrape it off of things...I simply won't eat mustard-y foods.   Yet I LOVE this recipe.  And speaking of mustard, the type/brand of mustard you use does matter. I've mentioned two easy-to-find national brands that work well with this.  But I've had it with other mustards and it's just not the same. 

Beef:  Marinated Flank Steak


This recipe really needs a better name because "marinated" doesn't describe the soy-ginger-garlicy goodness that leaves you drooling.  There are many similar marinades out there with different names, and I'm sure they're all good.  But I have no need to even try them because this one is so damn good.   And while the title says "flank" steak, it also works well with sirloins.  The flank is best, but for the budget dinners, it does wonders to a cheap sirloin.

Make sure to use fresh ingredients...onions, ginger, garlic.  None of that dried stuff, please.   

Pie:  Old-Fashioned Apple Pie


This recipe came from the McCalls cookbook we got for a wedding gift 21 years ago.  I've been making it ever since.  You can pretty much count on it for Thanksgiving and Christmas at my house.  Even if I make another pie, I still make the apple.  It's not a holiday meal without my apple pie.  When we have benefit pie auctions, my apple pie brings in a solid bid each time.  What can be better than that?  Pies for charity!!

When I first began making this I used the Pilsbury refrigerated pie crusts.  Now I make my own crust, but if you're looking for a short-cut, get the Pilsbury crusts.

Cake:  Carrot Cake with Cream Cheese Frosting


Incredibly moist carrot cake and the creamiest cream cheese frosting ever.  Make sure you thaw out the cream cheese before mixing so it's not lumpy.  Since the shredded carrots are the most time-consuming part of this recipe, I've found a short-cut:  I buy a bag of carrots and shred all of them in the food processor (using the fine shredding blade).  Then I bag them up in 4 cup servings, and freeze them!  I usually have a few bags of shredded carrots in my freezer.  When I need (or want!) to make this cake it's super easy to grab a bag of carrots...you don't even need to defrost them...just dump them in the mixing bowl.

Stir-Fry: Kung Pao Chicken


This is another recipe we've been making for 20 some years.  The only downside is that I haven't found a way to freeze parts of it for a make ahead meal....something to work on this summer!  Anyway, I just love the flavors in this sauce...so much better than any jarred/premade sauces you can pick up at the grocery store.  And, you can add just about any veggie to make it to your liking.  Shrimp or tofu is easily added or substituted for the chicken too.


Cookies:  Van's Chocolate Chip Cookies


The first thing you may notice is that these aren't so chocolate-y.  Don't let that stop you.  I'm not a fan of a lot of chocolate, and prefer to use about half the recommend chocolate chips in my cookies.  The linked recipe will give you a generous amount of chocolate!

This recipe comes from a woman named Van, whom I met when we lived in Indiana. These were the first home-made chocolate chip cookies that I fell in love with.  They just always turn out perfectly.    Van said the key was the Fleishmann's margarine and the Gold Medal brand flour.  I don't mess with perfection, so I always make them as she did.

Pudding:  Rice Pudding


The ultimate comfort food.   This version is baked in a water bath, leaving a creamy rice mixture on the bottom with custard on top.  Soooooooooo good!!

Pasta:  Baked Macaroni and Cheese


This is one of my newer favorites, as I've only been making it for 5 years.  I love the creaminess. Cook's Illustrated insists it's because of the colby cheese...which I've had difficulty finding at times.  It seems it used to be more readily available, but now I just find colby-jack, which is not what you want.   So go on a colby hunt. It's worth it!

Another plus....it's just as easy to quadruple the recipe and make up a bunch of pans to freeze.  I LOVE having this on hand in the freezer for some quick comfort food. When someone's in need and meals are being arranged, I can always volunteer immediately because this is stocked in my freezer.  It's kid-family friendly, vegetarian, and not spicy...all great pluses when you're cooking for someone recovering from an illness.

Alcoholic Beverage:  Minty Mojitos


Refreshing and light...perfect for a warm summer evening.  Kids seem to like the virgin versions of these too...just leave out the rum for theirs!  When you make this recipe, leave some room at the top.  That way you can adjust the taste....adding a bit more simple sugar, rum, or lime.  I tend to like a bit more lime!

Potato Dish:  Smoky Scalloped Potatoes


Another more recent favorite from Cook's Illustrated.  This is just soooooo darn good.  Creamy and cheesy.  It's a little time consuming and not anywhere near calorie-conscious so it gets made once a year for Thanksgiving or Christmas.  It fits in nicely with my holiday meal schedule, as it needs a 425 degree oven which is exactly the same as my cornbread and apple pie...so the three of them can cook up right after the turkey comes out of the oven.  Oh, and it can be assembled the day before, which helps with holiday stresses!

Appetizer:  Herbed Puffs

Hot little mouth-watering morsels of cheesy-herby goodness.  Can be made ahead and frozen. Enough said!

Dip:  Cilantro Dip


The best party dip.  Pour over a block of cream cheese and serve with water crackers. This one's been making the rounds within my circle of friends for several years.  You can make it as hot or mild as you like (just add the jalapenos a little at a time until it's just right for you). 

Holiday Meal Plan


When it comes to Thanksgiving and Christmas, I pretty much make the same dishes each year.  While that might seem boring, most of these dishes are only made for the holidays, so we look forward to them each year.

My holiday meals usually include the following dishes, which are all freshly home-made:
  • Apple Streusel Coffeecake (morning)
  • Turkey
  • Tofurky
  • Gravy
  • Mashed Potatoes (or Scalloped Potatoes)
  • Cornbread
  • Broccoli with Garlic Butter and Cashews
  • Green Beens with Pecans
  • Sausage Stuffing
  • Vegetarian Stuffing
  • Apple Pie
  • Turkey Pot Pie (for the day after)
The prep work and timing for these dishes could be overwhelming if I didn't do a lot of work the week before.  In this meal plan you'll find the shopping list, recipes, and a schedule for all the prep work.

The beauty behind this plan is the prep bowl chart.  I line up all my bowls, number them, and get out the ingredients. Then I fill the bowls assembly-line style.


Saturday, July 7, 2012

Grilled Rosemary Chicken Kebabs with Sweet and Sour Orange Dipping Sauce

Pin It
Tonight I selected grilled recipe #5 to try for the summer.  I'm requiring myself to make a new grilled recipe each week.  I've had two good ones, one great one, one so-so one so far.  Tonight was another great one!

I was pleasantly surprised by the flavoring from the chicken...even without the sauce.  It could definitely stand on its own.  And, I was actually really hesitant about the sauce because I'm not a huge fan of really sweet (and orange flavored) sauces.  But this was delicious!  I did find the original sauce a bit too sweet for my taste.  Nothing a dash of Siracha couldn't cure though!

Grilled Rosemary Chicken Kebabs 
with Sweet and Sour Orange Dipping Sauce
(adapted from Tracey's Culinary Adventures)

In a medium bowl mix together:
     1 1/2  teaspoons minced fresh rosemary     1 teaspoon dark brown sugar
     1 teaspoon kosher salt
     1/2 teaspoon freshly ground black pepper
     1/2 teaspoon crushed red pepper flakes
     1 tablespoon vegetable oil

Cut up 4-6 boneless skinless chicken breasts into 1" pieces.  Place the chicken pieces in the bowl and evenly coat with the mixture.


In a small pan, combine:
      1/4 cup orange marmalade
      1 tablespoon rice vinegar
      1/2 tsp minced fresh rosemary
      1/4 tsp Siracha hot sauce (can leave out if you want it mild)

Heat on low and then pour into a small serving bowl.

Place the chicken pieces on skewers, and grill on both sides until the chicken is done.

Remove from the skewers and serve with the dipping sauce. 


To make ahead and freeze:  Place the chicken mixture in a freezer bag, sucking out all the air (or use a FoodSaver).  Defrost and prepare the sauce while the chicken is defrosting.

Thursday, July 5, 2012

Honey-Lime Chicken...With a Kick!

Pin It
4th of July was yesterday.  We brought burgers and marinated chicken to our neighborhood potluck and I must admit I was secretly thrilled that the grill-chef cooked up these chicken breasts dead-last. That meant that by the time they came off the grill, the other folks were already stuffed with burgers, BBQ chicken, and loads of other side dishes.  I knew these were coming and made sure to save room for them.  They were worth the wait!  (And, because they were virtually ignored by the others, there are lots of leftovers!!...WHOHOOO!!!)

The honey-lime-cilantro-garlic flavors came shining through with a kick from the Siracha.  Loved the spicy zest from the Siracha and pepper flakes.  Flavorful AND SPICY (but really, not too spicy!).

And, and added bonus, is that these are great for making ahead and freezing.  Just put the chicken and marinade in a freezer bag, suck out all the air (or use a FoodSaver), and pop in the freezer.  Defrost and grill!

This recipe is a keeper and will be stocked year-round in Beauty, my favorite freezer.  (No, I've never named my cars, but I did name my freezer!)

Honey-Lime Chicken...With a Kick!
(Kitchen Meets...Girl)

Mix together in a bowl:
     3 TB soy sauce
     2 TB honey
     1 TB vegetable/canola oil
     1 juiced lime
     2 minced garlic cloves
     2 tsp Siracha
     2 TB chopped cilantro

Add and combine thoroughly:
     1 pound skinless, boneless chicken breasts

Marinate for at least an hour, and then grill until done, about 6-8 min. on each side. 

(On "Kitchen Meets...Girl" she made them into shish kebabs.  Either way works!)


Sunday, February 5, 2012

Mini Egg Rolls

Pin It
(Not the best photo.  It was dark, and I took it in a hurry.  Don't let that stop you from trying the recipe though!)
For our annual Christmas party, I thought about making potstickers -again-.  I make them every now and then, and while, they're a hit, I wanted to make something different.  Egg rolls were the first things to come to mind.  I searched different on-line recipes, and finally settled on an adaptation from Allrecipes.com.    I planned on making full sized egg rolls, but when Brian came home from the store, they were out of the full sized wrappers, and just had the won-ton wrappers. In the end, I LOVED the won-ton wrapper size for a party.  They're the perfect bite-sized morsel.  Easy to eat, and tasty too!

Mini Egg Rolls

Mix in a bowl and set aside:
     2 tablespoons all-purpose flour
     2 tablespoons water

Shred:
     3 C cabbage
     1/4-1/2 C carrots

Saute the shredded veggies with:
     2 TB soy sauce
     2 TB water

Cook thoroughly in a skillet:
     1 lb ground pork
     2 tsp fresh ginger, finely chopped
     2 tsp garlic powder

Mix the veggie/pork mixture together in a bowl.

Place a dab of the pork/veggie mixture in the center of a won-ton wrapper.  Place a dab of the flour paste on the top corner (this will be the "glue", keeping it together).  Fold the side corners in toward the middle.  Fold the bottom corner up toward the middle, rolling upward. Continue until you've used up the rest of the pork mixture. 

Heat oil (about 1/4" in the pan) in a large frying pan to 375 degrees (medium-high heat).  When the oil is hot enough to sizzle, quickly place the mini egg rolls in the pan.  Cook until the side is golden brown, then turn over.  When both sides are golden brown, remove from the pan onto a plate or shallow bowl that's lined with a paper towel (to absorb any grease).  

Serve plain (yes, they're good enough to eat without sauce!) or with your favorite Asian dipping sauce. 

FREEZING

They're also easy to freeze.  I doubled this recipe and served half at Christmas time, and half at our Super Bowl party today.  Once I filled the won-ton wrappers, I placed each mini egg roll on a baking sheet to flash freeze.  Then I placed them in a FoodSaver bag, sucked out all the air, and put them in my freezer, Beauty (Yes, I've named my freezer!!).   To quickly thaw, I put them in the microwave on defrost for a minute.  Then I proceeded to heat up the oil, and cook them following the directions below.  In just 5 minutes the egg rolls were ready to serve to guests.  It doesn't get any easier than that!

VEGETARIAN OPTION
My daughter's a vegetarian, so I used this same recipe and replaced the pork with GimmeLean ground "beef".   There were several vegetarians at the party, who agreed these were worth making again!


Tuesday, March 22, 2011

Chicken Cordon Bleu

Pin It
A few years ago I purchased the cookbook, Don't Panic- Dinner's in the Freezer, which had some pretty decent reviews.  I liked the variety of the recipes as well as the format.  The recipe page features a simple chart for a single batch, x3, x6, or x9....perfect for large batch cooking.  Not too long ago, a companion book came out, Don't Panic-  More Dinner's in the Freezer.  Some good reviews led me to purchase that as well.  (I know, I know....there are too many cookbooks to begin with in our home!!).  This book's been sitting up on the shelf, getting ignored as I pass it by for Cook's Illustrated recipes.  Poor thing!  A few weeks ago, I dusted it off and tried the first recipe.

The Chicken Cordon Bleu was pretty darn good.  Simple flavors, easy to make. 

Chicken Cordon Bleu
(Don't Panic-  More Dinner's in the Freezer)

Yield:  4 servings

Fill one shallow bowl/dish with:
      1/2 C flour
     1 TB paprika

Fill one shallow bowl/dish with:
     1 beaten egg

Fill one shallow bowl/dish with:
     1/2 C plain breadcrumbs (fresh or dried would both work)

Pound to uniform thickness, about 1/4" thick*
     4 large boneless, skinless chicken breast halves

Top each breast with
     1-2 slices of ham
     2 thin slices of Swiss cheese
     A dollop of the Bechamel sauce**

Roll up each chicken breast, and secure with a toothpick.  Dip the chicken piece in the flour, then the egg, and then the breadcrumbs, rolling each time to cover completely.

Heat a skillet with a bit of oil and brown all sides of the chicken.  Place browned chicken on a baking sheet.  Flash freeze. Once frozen solid,  freeze individual or family sized servings in a freezer bag, removing as much air as possible.  Or vacuum pack, which is my preferred method.

To serve:  Completely defrost chicken.   Bake in a 375 degree oven until done (25-30 min.).   Pour thawed Bechamel sauce* over chicken for the last 5 minutes of cooking.

*You can pound the breasts and make pretty little spirals, or you can take a shortcut like I did.  Make a slit inside the chicken breast and fill with the cheese, ham, and sauce.  Works just fine!

You can see how the sauce on top is a bit grainy.  Make that fresh instead!
**The Bechamel sauce is supposed to be made ahead.  Some of it goes into the chicken, and the rest is divided into little baggies, frozen, and defrosted to pour over the chicken at the end of the end of the cooking cycle.  The milk-based sauce doesn't freeze very well.  It takes on a lumpy, grainy texture once frozen.  It still adds flavor, and I'd rather make it with the frozen sauce than without.  

The consistency of the sauce that's placed inside the chicken  isn't as noticeable as the sauce poured on top.  I would continue to make some sauce ahead, and place it inside the chicken.  Then I'd also make up a bit of this sauce on eating day and not freeze it.  I always have butter, milk, and flour on hand.  I don't always have Swiss cheese though.  So the next time I make this, I'll put a bit of Swiss in a baggie, pack it with the chicken, and add fresh sauce on top.

Wednesday, March 16, 2011

Lentil-Barley Burgers

Pin It
Since the girl declared herself a vegetarian 4 years ago, we've been on the hunt for flavorful, kid-friendly vegetarian recipes.  It's so easy to just pop a frozen chik patty or a veggie burger in the toaster oven, and at times we do rely on them.  But my goal is to have a variety of healthy, home-made, frozen vegetarian foods on hand for the girl's meals.  This lentil-barley burger is perfect!

Lentil-Barley Burgers
(Cooking Light)

Use leftover cooked pearl barley with lentils, veggies, and seasonings for a hearty main-dish burger sans the bun. Fruit salsa adds bright flavors. Serve with lime wedges for added zest.
Total: 2 hours
Yield: 4 servings (serving size: 2 patties and 1/4 cup salsa)

Ingredients

  • 1 1/2  cups  water
  • 1/2  cup  dried lentils
  • Cooking spray
  • 1  cup  chopped onion
  • 1/4  cup  grated carrot
  • 2  teaspoons  minced garlic
  • 2  tablespoons  tomato paste
  • 1 1/2  teaspoons  ground cumin
  • 3/4  teaspoon  dried oregano
  • 1/2  teaspoon  chili powder
  • 3/4  teaspoon  salt, divided
  • 3/4  cup  cooked pearl barley
  • 1/2  cup  panko (Japanese breadcrumbs)
  • 1/4  cup  finely chopped fresh parsley
  • 1/2  teaspoon  coarsely ground black pepper
  • 2  large egg whites
  • 1  large egg
  • 3  tablespoons  canola oil, divided

1. To prepare burgers, combine 1 1/2 cups water and lentils in a saucepan; bring to a boil. Cover, reduce heat, and simmer 25 minutes or until lentils are tender. Drain. Place half of lentils in a large bowl. Place remaining lentils in a food processor; process until smooth. Add processed lentils to whole lentils in bowl.

2. Heat a large nonstick skillet over medium-high heat. Coat pan with cooking spray. Add onion and carrot; sauté 6 minutes or until tender, stirring occasionally. Add garlic; cook 1 minute, stirring constantly. Add tomato paste, cumin, oregano, chili powder, and 1/4 teaspoon salt; cook 1 minute, stirring constantly. Add onion mixture to lentils. Add remaining 1/2 teaspoon salt, barley, and next 5 ingredients (through egg); stir well. Cover and refrigerate 1 hour or until firm.

3. Divide mixture into 8 portions, shaping each into a 1/2-inch-thick patty. Heat 1 1/2 tablespoons oil in a large nonstick skillet over medium-high heat. Add 4 patties; cook 3 minutes on each side or until browned. Repeat procedure with remaining 1 1/2 tablespoons oil and 4 patties.

Cooking Light published a recipe for Fiery Fruit Salsa to serve with the burgers.  Here's that recipe as well:

Fiery Fruit Salsa
(Cooking Light)

Mis together, cover, and refrigerate:
  • 1/4  cup  finely chopped pineapple
  • 1/4  cup  finely chopped mango
  • 1/4  cup  finely chopped tomatillo
  • 1/4  cup  halved grape tomatoes
  • 1  tablespoon  fresh lime juice
  • 1  serrano chile, minced

Nutritional Information :

Serving Size:  2 patties, 1/4 cup Salsa;  Calories: 315;  Fat:  12.8g (sat 1.2g,mono 6.8g,poly 3.5g);  Protein:  12.8g:  Carbohydrate:  39.2g;  Fiber:  9.5g;  Cholesterol:  53mg;  Iron:  3.9mg;  Sodium:  539mg;  Calcium:  60mg

Sunday, March 13, 2011

Flaky Buttermilk Biscuits

Pin It
I've been meaning to try these biscuits for awhile now.  Every time I think of making them, I can't because I don't keep buttermilk on hand.  I know there are substitutes, but when I'm making a recipe for the first time, I like to make it the way it was written.  Anyway, once I finally remembered to buy some buttermilk, our family loved these!  They're a bit more work (especially when compared to those that pop out of cans....) but so worth it.  And, the dough can be frozen.  I made up a couple batches and put some in the freezer for another time.


Flaky Buttermilk Biscuits
(Cook's Illustrated)

The dough is a bit sticky when it comes together and during the first set of turns. Set aside about 1 cup of extra flour for dusting the work surface, dough, and rolling pin to prevent sticking. Be careful not to incorporate large pockets of flour into the dough when folding it over. When cutting the biscuits, press down with firm, even pressure; do not twist the cutter. The recipe may be prepared through step 2, transferred to a zipper-lock freezer bag, and frozen for several weeks. Let the mixture sit at room temperature for 15 minutes before proceeding.

Makes 12 biscuits

2 1/2 cups unbleached all-purpose flour (12 1/2 ounces), plus additional flour for work surface
1 tablespoon baking powder
1/2 teaspoon baking soda
1 teaspoon table salt
2 tablespoons vegetable shortening , cut into 1/2-inch chunks
8 tablespoons unsalted butter (1 stick), cold, lightly floured and cut into 1/8-inch slices (see illustration below)
2 tablespoons unsalted butter , melted
1 1/4 cups low-fat buttermilk , cold

1. Adjust oven rack to lower-middle position; heat oven to 450 degrees. Whisk flour, baking powder, baking soda, and salt in large bowl.

2. Add shortening to flour mixture; break up chunks with fingertips until only small, pea-sized pieces remain. Working in batches, drop butter slices into flour mixture and toss to coat; pick up each slice of butter and press between floured fingertips into flat, nickel-sized pieces (see illustration at right). Repeat until all butter is incorporated; toss to combine. Freeze mixture (in bowl) until chilled, about 15 minutes.

3. Spray 24-inch-square area of work surface with nonstick cooking spray; spread spray evenly across surface with kitchen towel or paper towel. Sprinkle 1/3 cup of extra flour across sprayed area; gently spread flour across work surface with palm to form thin, even coating. Add all but 2 tablespoons of buttermilk to flour mixture; stir briskly with fork until ball forms and no dry bits of flour are visible, adding remaining buttermilk as needed (dough will be sticky and shaggy but should clear sides of bowl). With rubber spatula, transfer dough onto center of prepared work surface, dust surface lightly with flour, and, with floured hands, bring dough together into cohesive ball.

4. Pat dough into approximate 10-inch square; roll into 18 by 14-inch rectangle about 1/4 inch thick, dusting dough and rolling pin with flour as needed. Following illustrations below, using bench scraper or thin metal spatula, fold dough into thirds, brushing any excess flour from surface; lift short end of dough and fold in thirds again to form approximate 6 by 4-inch rectangle. Rotate dough 90 degrees, dusting work surface underneath with flour; roll and fold dough again, dusting with flour as needed.

5. Roll dough into 10-inch square about 1/2 inch thick; flip dough and cut nine 3-inch rounds with floured biscuit cutter, dipping cutter back into flour after each cut. Carefully invert and transfer rounds to ungreased baking sheet, spaced 1 inch apart. Gather dough scraps into ball; roll and fold once or twice until scraps form smooth dough. Roll dough into 1/2-inch-thick round; cut three more 3-inch rounds and transfer to baking sheet. Discard excess dough.

6. Brush biscuit tops with melted butter. Bake, without opening oven door, until tops are golden brown and crisp, 15 to 17 minutes. Let cool on baking sheet 5 to 10 minutes before serving.

Pecan-Crusted Chicken

Pin It
I'm a wee bit obsessed with the recipes from Cook's Illustrated.  They have a proven track record in our home.  They have a sister publication, Cook's Country, which seems to print simpler, homey, more family-friendly recipes as compared to Cook's Illustrated. I haven't tried a lot from them, but this pecan-crusted chicken recipe is wonderful.

Pecan-Crusted Chicken
(Cook's Country)
  • 2 large eggs
  • 4 teaspoons Dijon mustard
  • 3 garlic cloves, minced
  • 2 teaspoons dried tarragon
  • Salt and pepper
  • 4 boneless skinless chicken breasts, halved horizontally (about 1/2 inch thick each)
  • 2 cups pecans
  • 2 slices hearty white sandwich bread, torn in pieces
  • 4 teaspoons cornstarch
  • 1 tablespoon dark brown sugar
  • 1/8 teaspoon cinnamon
  • 1 cup vegetable oil
  • 1.  Adjust oven rack to middle position and heat oven to 250 degrees. Line rimmed baking sheet with wire rack. Whisk eggs, mustard, garlic, tarragon, 1/2 teaspoon salt, and 1/2 teaspoon pepper in large bowl. Add chicken, coat well, cover with plastic wrap, and refrigerate while preparing nut mixture.

    2.  Pulse pecans in food processor until finely chopped, with some pebble-sized pieces. Transfer to pie plate or shallow rimmed dish. Pulse bread in food processor until finely ground. Add bread crumbs to nuts and stir in cornstarch, brown sugar, 1/2 teaspoon pepper, 1/4 teaspoon salt, and cinnamon.

    3.  Working one at a time, remove cutlets from egg mixture, letting excess drip back into bowl. Thoroughly coat chicken with nut mixture, pressing on coating to help it adhere, and transfer to large plate.

  • 4.  Heat 1/2 cup oil in large nonstick skillet over medium-high heat until shimmering. Place 4 cutlets in skillet and cook until golden brown on both sides, 3 to 4 minutes per side (lower heat if crust is browning too quickly). Transfer chicken to rack on baking sheet and keep warm in oven. Discard oil and solids from skillet and repeat with remaining oil and cutlets. Season cutlets with salt and pepper and serve immediately.

    This recipe freezes beautifully.  I make them ahead through Step 3 and then flash freeze the breasts.  On cooking day, I defrost in the fridge, and continue on with Step 4. 

Saturday, March 12, 2011

A Thing of Beauty

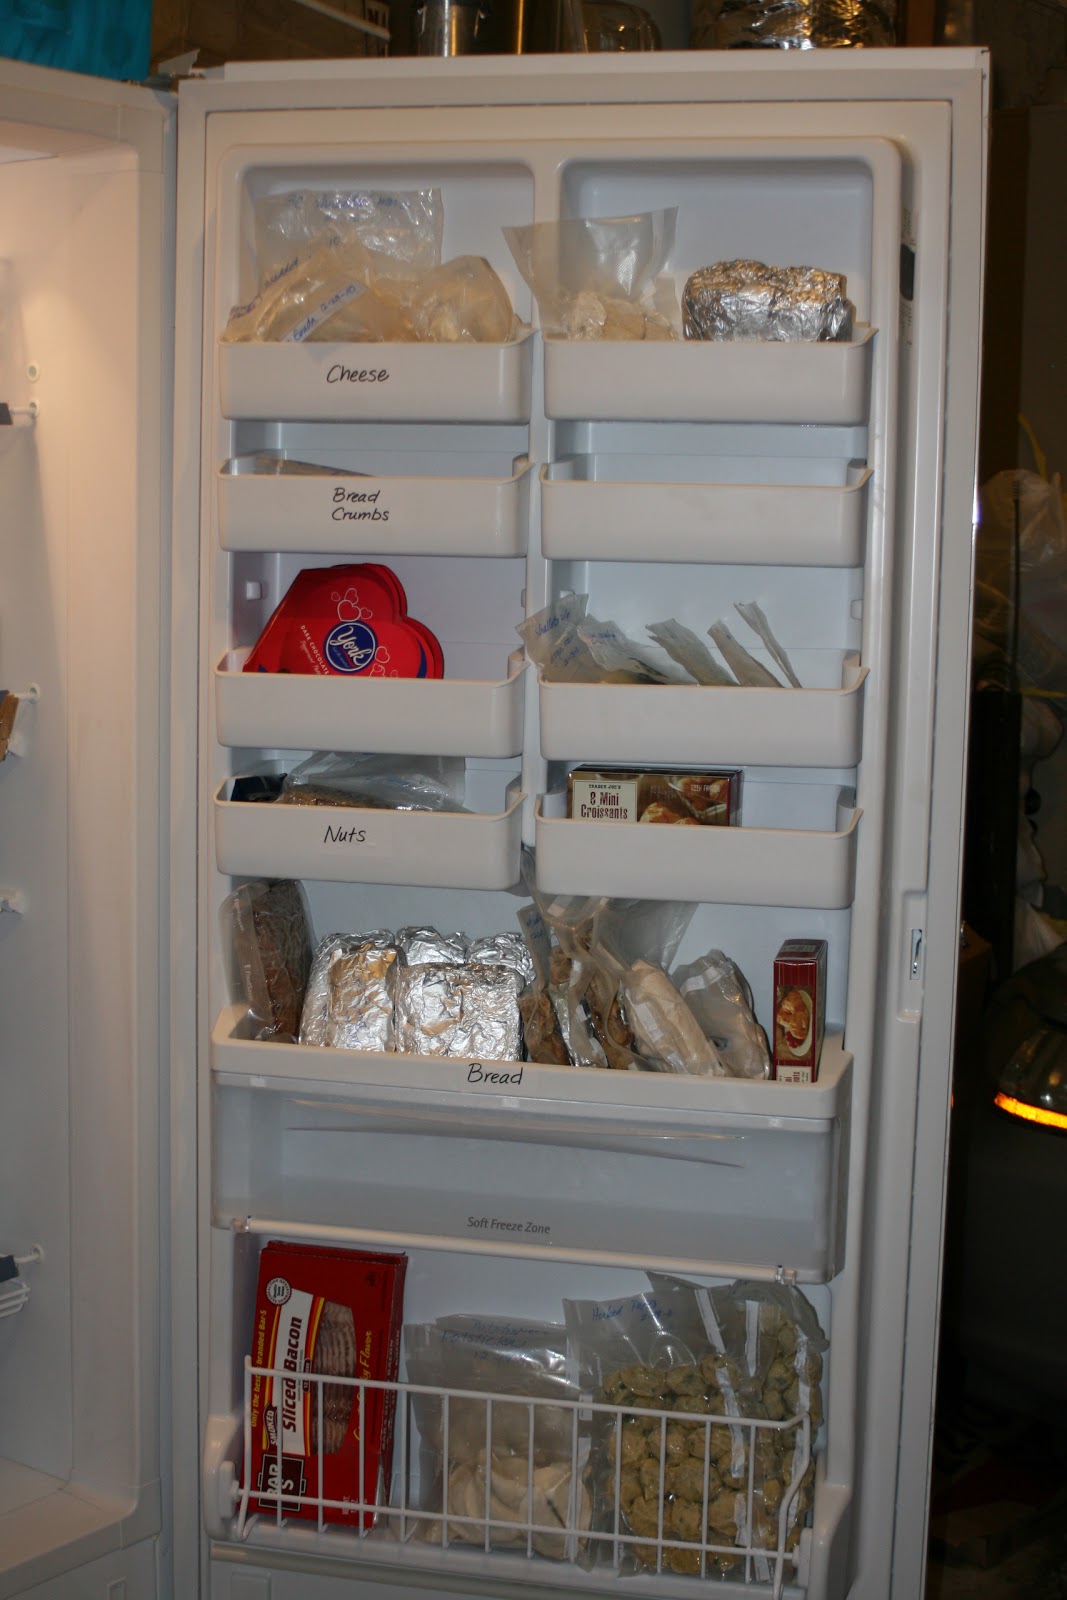
Pin It I need to introduce you to my new best friend:  Beauty.  Beauty is my new upright freezer.  I planned on naming her Betty, Joy, Martha, or some other feminine food-related name.  In the end though, I found myself saying, "Hello, Beauty," every time I passed her.  So, Beauty it is.

I've been dreaming of Beauty for years.  Yes, years.  I never really thought she'd be a reality because of 1) the cost, and 2) the space.  We already have a second fridge in our organized-but-jam-packed garage.  I just didn't see a spot.

A couple months ago, I started looking at the space differently.  When you walk into the garage, there was a shelving unit filled with board games right in front of you.  Behind the shelves, was our second refrigerator.  With K getting older, I started realizing that many of these games hadn't been used in years.  I took them all down, and got rid of half our games.  Some went into our coat closet, a few went to K's room, a few to friends, and the rest to Goodwill.  With that shelving unit gone, there was now room for an UPRIGHT FREEZER.  WHOHOOOOO!!!!


I started looking around.  Read my Consumer Reports.  Debated between frost-free models and manual defrost models.  Lots of pros/cons for both. Ended up with a frost-free Energy Star rated one from Sears.  There was a Frigidaire model in competition too, but the price on the Sears model sealed the deal.   

Beauty arrived on Superbowl Sunday, just before our guests.  I couldn't wait for the game to be over.  The organizing bug was in me and was begging to come out!

I sketched and planned.  I bought some new plastic bins and labeled them.  I've cooked batches and batches of food.  I've sucked and sealed bags galore.  I bought a quarter cow.  The freezer is now full...full of pre-made meals that will make busy work day meals a dream.

Looking back at my organized freezer pics pre-Beauty, I'm amazed at how little room I actually had.    There was never room for seasonal/holiday foods.   There wasn't room for much variety.  No room for an extra bag of ice.   All that has changed!


Before Beauty:  The kitchen freezer

The kitchen freezer now has four plastic bins just for vegetarian food.  It also has a section for breakfast foods, and ice.  The door holds a whole row of juice cans.  Ice packs and yeast are on the lower door shelf.  The outside freezer (above the fridge) has berries in the door, and is waiting for the quarter cow to fill it up!

Lasagna with Pesto

Pin It
How did we ever live without pesto?  And why did it take us 25 years to learn about it?  We were introduced to it at a Bloomington, Indiana restaurant we used to frequent.  Just simple pesto and pasta, but oh, so good!  That was back in the early 90s.   Turning to my can't-live-without cookbook, San Francisco Encore, I've been making pesto ever since.  
And, along with that recipe for pesto was another recipe which has been a favorite of ours for nearly 20 years:  Lasagna with Pesto.  This recipe calls for lasagna roll-ups, which is a fun way to present lasagna.  You could just as easily place the lasagna noodles flat in the pan.  But I love the ruffled edges of this dish, so I've always rolled them!


Lasagna with Pesto (San Francisco Encore)

1 lb ricotta cheese
1 ½ C freshly grated Parmesan cheese
1 C shredded mozzarella cheese
½ C minced fresh parsley
½ C minced green onion
½ tsp minced garlic
1 egg yolk
1 tsp dried basil
½ tsp marjoram
salt to taste
freshly ground black pepper

1 pound lasagna, cooked, rinsed in cold water and drained.
Pesto Sauce (see below)

Preheat oven to 350 degrees. Grease a shallow baking dish. Combine all the ingredients except noodles and Pesto Sauce. Blend well. Taste and correct seasonings. Spread some of the filling over each lasagne noodle. Roll up jelly-roll fashion. Stand vertically in the baking dish in a single layer. Spoon Pesto Sauce over the top of each roll. Cover and bake for 30-40 minutes, or until bubbly and heated through. Serve immediately.

To freeze:  I have two ways to freeze this.  One way is to make the filling and simply freeze it before you  assemble the lasagna.  This is simple, but requires more work later.  

The second way to freeze it, is to partially cook the noodles so they're still pliable enough to roll, but not quite al dente.  Line the pan with foil, assemble the lasagna, and then flash freeze the whole pan.  Once frozen, remove from dish (still in foil) and place in a freezer bag.  Remove air or vacuum pack.  To reheat, defrost, remove from bag, place back in same pan, and cook as directed.


Pesto Sauce


2 C fresh basil leaves (or 3 T dried)
½ C olive oil
2 TB pine nuts
2 cloves garlic
1 tsp salt

½ C freshly grated Parmesan cheese
2 TB butter, softened

In a food processor or blender, combine the first 5 ingredients. Transfer to a bowl. Beat in the cheese by hand, incorporating evenly. Beat in the butter.

To freeze the pesto, they recommend doing freezing it without the butter and Parmesan, and adding those in just before using it. However, I will admit that I have frozen this pesto without these ingredients, and with the butter and Parmesan. I haven't noticed much difference, so I just freeze the whole recipe! 

Thursday, October 8, 2009

Spicy Chicken Sandwiches with Cilantro-Lime Mayo

Pin It
In my quest to find recipes that only use ingredients from my limited supply of pantry staples, I came upon this little gem in the December 2008 issue of Cooking Light: Spicy Chicken Sandwiches with Cilantro-Lime Mayo. The prep was simple, other than the fact that I overlooked the part about marinating the chicken for 2-8 hours....which is why we didn't have these for dinner last night!

Now, I am not a mayo fan...never have been. Still, I wanted something flavorful with my chicken. So I made a bit of a lime juice, garlic, and cilantro mixture to spread on mine. That's what you see in the little glass on the right.

Since this recipe (and most of those from Cooking Light) are available on MyRecipes.com, there are lots of ratings and comments. You can read yourself silly with all the comments, especially since many cooks change the recipes in subtle (and not so subtle ways). After reading a few of them, you start to wonder exactly what recipe they rated, and which altered recipe is actually better than the others. I appreciate what they've done, but I usually decide to prepare the original recipe, and then compare my thoughts with the comments. In this case, though, I did make one little tiny change....I used 4 TB hot sauce instead of 3. I like things spicy, and some reviewers didn't find this recipe spicy enough...even recommending 6 TB of hot sauce.

OK...I'm coming clean...I probably made as many substitutions/changes as the average reviewer. You can see mine below, along with my thoughts about them. In the end though, the sandwich can be summed up best by my husband who said, "That was delicious!" at the end of the meal. Most definitely a keeper!

And, another great thing about this recipe is that it will freeze well. I cooked up two of the chicken pieces for tonight, and flash froze the other two for later. Next time I'll make more!

Spicy Chicken Sandwiches with Cilantro-Lime Mayo
(Cooking Light)
Chicken cutlets are encrusted with tortilla chip crumbs, which yield a satisfying crunch. You can also use spicy chips for more heat.
4 servings (serving size: 1 sandwich)
  • Mayo:
  • 1/4 cup reduced-fat mayonnaise
  • 2 tablespoons chopped fresh cilantro
  • 1 teaspoon fresh lime juice
  • 1 garlic clove, minced
  • Chicken:
  • 1/4 cup egg substitute
  • 3* tablespoons hot sauce (such as Tabasco**)
  • 1 teaspoon dried oregano***
  • 1/2 teaspoon salt
  • 2 (6-ounce) skinless, boneless chicken breast halves
  • 4 1/2 ounces baked tortilla chips (about 6 cups)
  • 2 tablespoons olive oil

    Remaining ingredients:
  • 4 (2-ounce) Kaiser rolls, split
  • 12 (1/8-inch-thick) red onion slices
  • 4 lettuce leaves
1. To prepare mayo, combine the first 4 ingredients.
2. To prepare chicken, combine egg substitute, hot sauce, oregano, and salt in a large zip-top plastic bag. Cut chicken breast halves in half horizontally to form 4 cutlets. Add chicken to bag; seal. Marinate in refrigerator 2 hours or up to 8 hours, turning bag occasionally.
3. Place tortilla chips in a food processor; process 1 minute or until ground. Place ground chips in a shallow dish.
4. Working with one cutlet at a time, remove chicken from marinade, allowing excess to drip off. Coat chicken completely in chips. Set aside. Repeat procedure with remaining chicken and chips.
5. Heat a large nonstick skillet over medium heat. Add olive oil to pan, swirling to coat. Add chicken to pan; cook 3 minutes on each side or until browned and done. Spread mayo evenly over cut sides of rolls. Layer bottom half of each roll with 3 onion slices, 1 lettuce leaf****, and 1 chicken cutlet; top with top halves of rolls.
*I used 4 TB, which I thought was just right. It might be too spicy for the Pace Picante crowd or kiddos, but if you want a bit of heat (not a lot) try 4 TB.
**I used Tapatio
***OK...I changed the recipe more than I admitted...I didn't have oregano so I used Italian seasoning! Tasted great to me!
****OOPS! I had the lettuce all ready to go, and forgot to put it on the sandwiches! DOH!

Calories: 419 (28% from fat) Fat: 13.2g (sat 1.7g,mono 6.1g,poly 3.4g) Protein: 28.1g Carbohydrate: 46.8g Fiber: 2.6g Cholesterol: 49mg Iron: 3.2mg Sodium: 759mg Calcium: 101mg

To make these ahead for the freezer, prepare steps 2-4.  Freeze the raw, coated chicken in a single layer.   I usually make a dozen or so of these, so I just have to cook them up and make the sauce (which won't freeze well).  But having steps 2-4 done ahead, really is a time saver!

Sunday, October 4, 2009

Prosciutto and Fontina-Stuffed Chicken Breasts

Pin It
One of the greatest culinary challenges I'm facing on Sabbatication, is that my food staples are quite limited. I don't have endless types of vinegar, spices, seasonings, etc. I have (literally):
  • salt
  • pepper
  • Italian seasoning
  • cajun seasoning
  • crushed red pepper
  • seasoned salt
  • extra-virgin olive oil
  • balsamic vinegar
  • sesame oil
  • white wine vinegar
  • chardonnay
  • dijon mustard
  • soy sauce
  • hot sauce
  • garlic
I don't want to go out and buy a bunch of ingredients; I'd like to keep it simple. For those of you who know me well, keeping things simple is a challenge. When cooking, I use a lot of ingredients. I make my own sauces, and nearly everything is from scratch. So, I've been going through my tried and true recipes looking for foods that use what I have. I've checked out cookbooks and cooking magazines from the library (Yes, I know it's all on-line...I just love to flip through a bound publication.) perusing them for recipes that use these ingredients. The challenge I have is that I don't want it to all taste the same. I want variation!

Last week, I found a few recipes from Cooking Light, and made the first one last night. It's from the December 2008 issue (a GREAT issue by the way...found several recipes to add to my "To Try" file), Prosciutto and Fontina-Stuffed Chicken Breasts , p. 177.

I tripled the recipe, planning on making some to freeze for later, because I knew we'd like this one. The first thing I noticed was that the filling looked a little skimpy. I wasn't sure how I would have enough to stuff 12 chicken breasts with 2 TB of filling each. In the end, I added a bit more fontina (1 cup instead of 3/4 cup for a tripled batch), but I could have used a bit more.

The chicken breasts were HUGE, so I chopped each one in half (OK...that means they were really quartered, because they're already halved), and made a pocket in each piece. I only had enough filling for 10 of them. So, if I were to make this again (which I will) I'll make a bit more filling.

We had them for dinner last night and, OMG, they were delicious!! This will be the next entree I make for our meal exchange. I liked the simplicity and the fact that they'll freeze well. I love to have food like this ready-to-go in the freezer.

Right after I made them I learned that a friend's husband broke (really crushed!) his ankle yesterday and the whole family had been in the hospital all day. He came home today and I brought some chicken over for their family to eat. I LOVE having food on hand when someone's sick or in the hospital. I was especially glad that even in our little temporary digs, I was still able to help a friend!

Prosciutto and Fontina-Stuffed Chicken Breasts
  • Cooking spray
  • 1 ounce chopped prosciutto
  • 1 1/2 teaspoons minced fresh rosemary
  • 2 garlic cloves, minced
  • 1/4 cup (1 ounce) shredded fontina cheese
  • 4 (6-ounce) skinless, boneless chicken breast halves
  • 1/4 teaspoon freshly ground black pepper
  • 42 saltine crackers (about 1 sleeve)
  • 1/2 cup all-purpose flour
  • 2 large egg whites
  • 1 tablespoon Dijon mustard
  • 2 tablespoons canola oil

1. Heat a large nonstick skillet over medium-high heat. Coat pan with cooking spray. Add prosciutto to pan; sauté 2 minutes or until browned. Add rosemary and garlic to pan; sauté 1 minute. Spoon prosciutto mixture into a bowl; cool to room temperature. Stir in fontina cheese; set aside.

2. Cut a horizontal slit through thickest portion of each chicken breast half to form a pocket. Stuff about 2 tablespoons prosciutto mixture into each pocket; press lightly to flatten. Sprinkle chicken evenly with pepper.

3. Place crackers in a food processor; process 2 minutes or until finely ground. Place cracker crumbs in a shallow dish. Place flour in another shallow dish. Combine egg whites and mustard in another shallow dish, stirring mixture with a whisk.

4. Working with one chicken breast half at a time, dredge chicken in flour, shaking off excess. Dip chicken into egg white mixture, allowing excess to drip off. Coat chicken completely with cracker crumbs. Set aside. Repeat procedure with remaining chicken, flour, egg white mixture, and cracker crumbs.

5. Heat pan over medium-high heat. Add oil* to pan, swirling to coat. Add chicken to pan; reduce heat to medium**, and cook 10 minutes on each side or until browned and done.

Calories: 381 (33% from fat) Fat: 14g (sat 3g,mono 6.4g,poly 2.9g) Protein: 46.6g Carbohydrate: 14.1g Fiber: 0.6g Cholesterol: 113mg Iron: 2.4mg Sodium: 591mg Calcium: 74mg
*I also added a smidge of butter. I think foods brown better with a bit of butter.
**Medium might be a bit high. If the outside is browning too quickly (which happened to me at first) make sure you turn down the heat a bit. You want a nice golden brown


Ready to flash freeze ----------->