Food and Garden Dailies started as a way to record my family's favorite recipes. It has come in handy many times when I'm asked for a recipe. I simply email a link to the blog! But I couldn't just stick to recipes. The kitchen is tied to the garden in so many ways...and so I let you into my ever changing garden as well.

If you're interested in my all-time favorite recipes, check out this post first: My Favorite Recipes

Monday, February 6, 2012

Puff Pastry Pinwheels with Prosciutto and Manchego Cheese

Pin It
Puff Pastry Pinwheels with Prosciutto and Manchego Cheese
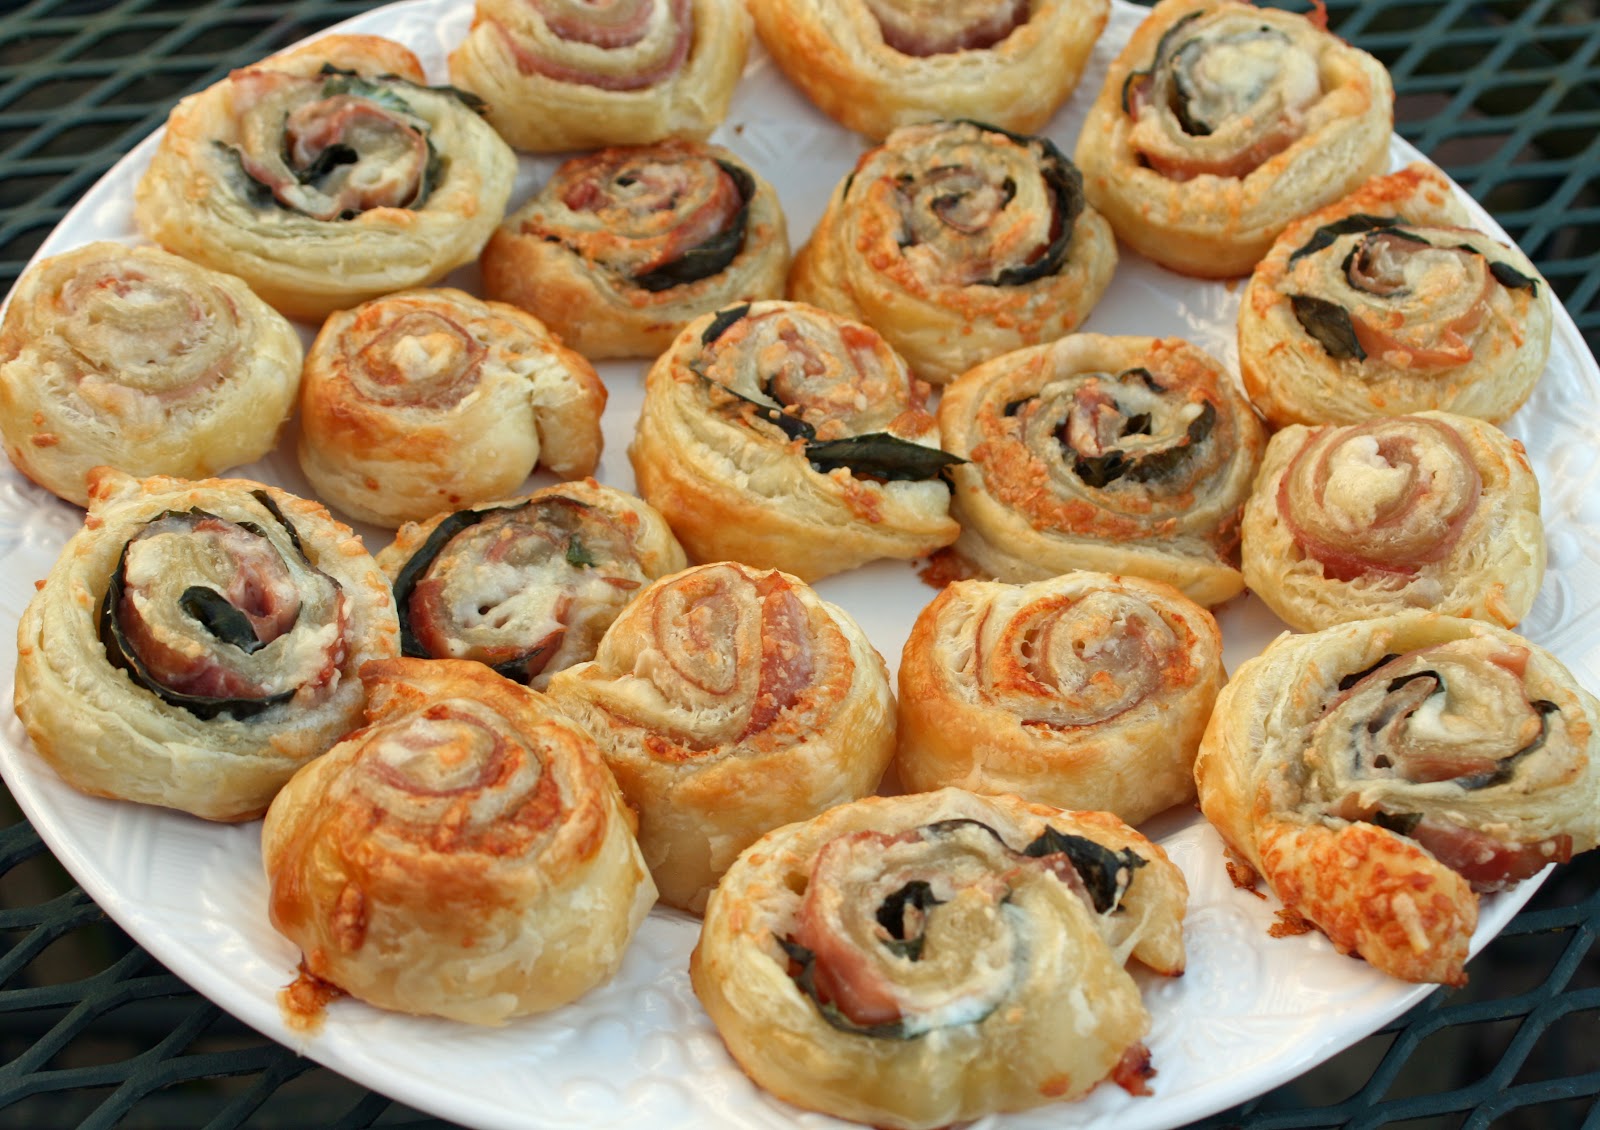
Prosciutto and Machego Cheese Pinwheels; Prosciutto, Basil, and Gruyere Cheese Pinwheels
So what appetizer was the hit of the Super Bowl party last night?  Scrumptious little puff pastry pinwheels!  I made two types...one with prosciutto and Manchego cheese filling, and another with prosciutto, basil, and Gruyere cheese.  Which one was best?  Ummm...they were gobbled up so quickly that they were both declared winners.

And how easy were they to make...FAST & EASY!!   Puff pastry pinwheels will now be appearing at any event we host.  They were that good.  (And that easy!)

Now, I'm definitely a measure and follow the recipe kinda' girl, but this is truly one "recipe" where you can easily add more of what you like, or change things up a bit.  Experiment and have a little fun. Live dangerously and just plop on your ingredients.

Puff Pastry Pinwheels with Prosciutto and Manchego Cheese

Ingredients:
1 package frozen puff pastry (I used Pepperidge Farm)
About 10 thin slices of prosciutto
About 1/2- 1 cup of shredded Manchego cheese (found in the specialty cheese section of your upscale grocery stores)
egg white and a little water, whisked together in a bowl

Directions:
1.  First you'll need puff pastry sheets.  I used the Pepperidge Farm ones from the freezer section.  Since I was making these right away, I opened up the package and let them defrost on the counter for about 40 minutes.  You can also leave the box in your refrigerator overnight to defrost.

2.  Once the puff pastry is defrosted, lay it flat.  (You can leave it this size, or you can roll it out so that you're able to make a few more pinwheels for your party.)

3.  Layer prosciutto and Manchego cheese (however much you'd like!) on the pastry. 

4.  Roll up into one big spiral.

5.  Some recipes say to refrigerate for 3 hours (or more), while other recipes don't mention refrigerating at all before you cut them.  Since I didn't read this step ahead of time, I didn't have 3 hours!  I did put them in the refrigerator for 45 minutes and then sliced them into 1/2" sections.  I saved some of the roll and let that refrigerate overnight.  What I learned is that they're easier to slice when they've been refrigerated.  So, if you have time, go ahead and refrigerate.  If not, just roll up, and slice away!

6.  Lay the sections flat, so you see the spiral.  Brush the egg/water mixture over the top for a glossy finish.

7.  Bake at 400 degrees for about 12-15 minutes, or until golden on top.

Serve hot or at room temperature.  (That's the beauty of these...they taste great at room temperature, so you can make them ahead to bring to a party.)

You should be able to get about 20 spirals from half the package, so 40 if you're using the whole package.  

Feel free to experiment with other fillings:

Muenster cheese, Parmesan cheese, chopped green onion, garlic salt, spinach

Prosciutto, basil, and Gruyere cheese

Cream cheese, broccoli, ham

Pesto, cream cheese

Cream cheese, spinach, onion, and Italian sausage

Serrano ham, Manchego cheese

It doesn't have to be savory either...you can go sweet too!  Think of fruit pie fillings...oh my, the options are endless!  Have fun experimenting!

Sunday, February 5, 2012

Spicy Chicken Tortilla Roll-Ups

Pin It
Today was the Super Bowl party.  Until kick off the only thing I could've told you about the game was that Madonna was performing at half-time.  OK...I know...that's not even about the game.  That shows you how little I knew.  What I did know, however, was that a bunch of hungry people were coming to my home, and I needed some tasty appetizers that I could quickly prepare.

I have a line up of tried-and-true recipes, but I wanted something new.  So I headed over to Pinterest and scanned my "To Try" boards.  These roll-ups (pinned from the Homemade by Holmnan blog) caught my eye because 1) SPICY always catches my eye, and 2) my roll-ups are BORING.    Of the 3 recipes I found,  I thought these would be the most time consuming but that was not the case...they were quick and easy. 

Spicy Chicken Tortilla Roll-Ups
(adapted from Homemade by Holman)

Cook in a boiling pot of water:
     1  1/2 pounds of boneless, skinless chicken breasts

When the chicken is cooked through (no pink in the center), remove from the pot.  Cut off any chicken "gunk"...tendons, fat...the yucky stuff.  Shred the chicken with two forks* while it's still warm.

Mix the shredded chicken with:
     1 10 oz. can Rotel (tomatoes and green chiles), drained
     12 oz cream cheese, softened
     1 C shredded cheddar or monterey Jack cheese (I used cheddar)
     1 clove garlic, minced
     1 TB chili powder
     1/2 tsp cayenne powder
     1 tsp cumin
     1/2 tsp garlic salt
     1/4 C chopped cilantro
     6 green onions, finely chopped (white and green parts)

Spread the chicken mixture over the surface of a tortilla, and roll up tightly.  You can slice them at this point, but I find it best to refrigerate them for a bit (20+ minutes...overnight is fine too) before slicing.  Slice them to 1/2" - 1" pieces.  Try not to eat too much before serving!!

They were delicious!  So much better than my slap-some-cream-cheese-ham-and-a-long-green-onion-on-a-tortilla kind of roll up.  MUCH better.  So much better that I'll never, ever go back to those boring roll ups.  As for the spiciness level, they weren't too spicy.  A hint of a kick.  If you really like spicy (as I do), you could up the chili powder or cayenne pepper.  I might try that next time. 

*OR....try my new favorite way to shred chicken...in a KitchenAid mixer!!  I read about this on Pinterest too.  It's so incredibly easy you'll wonder why you never thought of it before!  Just put the chicken (cut in quarters or halves) in the mixing bowl with the paddle.  Turn on low (speed 2 or so) and watch the chicken shred without any work at all.  It doesn't mush it or create a weird texture...it perfectly shreds your chicken!!  After I shred the chicken in the mixer, I simply dumped the rest of the ingredients in, and let the mixer stir it together.  Easy-peasy!  Here's a tutorial I found on the Taste and See God's Goodness blog.


Mini Egg Rolls

Pin It
(Not the best photo.  It was dark, and I took it in a hurry.  Don't let that stop you from trying the recipe though!)
For our annual Christmas party, I thought about making potstickers -again-.  I make them every now and then, and while, they're a hit, I wanted to make something different.  Egg rolls were the first things to come to mind.  I searched different on-line recipes, and finally settled on an adaptation from Allrecipes.com.    I planned on making full sized egg rolls, but when Brian came home from the store, they were out of the full sized wrappers, and just had the won-ton wrappers. In the end, I LOVED the won-ton wrapper size for a party.  They're the perfect bite-sized morsel.  Easy to eat, and tasty too!

Mini Egg Rolls

Mix in a bowl and set aside:
     2 tablespoons all-purpose flour
     2 tablespoons water

Shred:
     3 C cabbage
     1/4-1/2 C carrots

Saute the shredded veggies with:
     2 TB soy sauce
     2 TB water

Cook thoroughly in a skillet:
     1 lb ground pork
     2 tsp fresh ginger, finely chopped
     2 tsp garlic powder

Mix the veggie/pork mixture together in a bowl.

Place a dab of the pork/veggie mixture in the center of a won-ton wrapper.  Place a dab of the flour paste on the top corner (this will be the "glue", keeping it together).  Fold the side corners in toward the middle.  Fold the bottom corner up toward the middle, rolling upward. Continue until you've used up the rest of the pork mixture. 

Heat oil (about 1/4" in the pan) in a large frying pan to 375 degrees (medium-high heat).  When the oil is hot enough to sizzle, quickly place the mini egg rolls in the pan.  Cook until the side is golden brown, then turn over.  When both sides are golden brown, remove from the pan onto a plate or shallow bowl that's lined with a paper towel (to absorb any grease).  

Serve plain (yes, they're good enough to eat without sauce!) or with your favorite Asian dipping sauce. 

FREEZING

They're also easy to freeze.  I doubled this recipe and served half at Christmas time, and half at our Super Bowl party today.  Once I filled the won-ton wrappers, I placed each mini egg roll on a baking sheet to flash freeze.  Then I placed them in a FoodSaver bag, sucked out all the air, and put them in my freezer, Beauty (Yes, I've named my freezer!!).   To quickly thaw, I put them in the microwave on defrost for a minute.  Then I proceeded to heat up the oil, and cook them following the directions below.  In just 5 minutes the egg rolls were ready to serve to guests.  It doesn't get any easier than that!

VEGETARIAN OPTION
My daughter's a vegetarian, so I used this same recipe and replaced the pork with GimmeLean ground "beef".   There were several vegetarians at the party, who agreed these were worth making again!


Friday, January 27, 2012

In Search of the Perfect Mug

Pin It When you have something that works, you don't give it much thought.  You count on it to be reliable and serve its purpose.  Until it up and dies on you.  Sometimes replacing a well-loved product becomes more of a challenge than you expected.  So what product did I have and love that up and died?  My mug.  Yes, a silly mug.


miGo Senja         

I'm not asking for much in a mug.  I want it to be stainless steel.  With a handle.  I want to be able to sip out of either side without the beverage dribbling down my shirt.  I want it to keep my beverages hot or cold, depending on their starting temperature.  I want it to fit in my car's cup holders.  I want it to be fairly lightweight, as I tend to walk around with it, and have arthritic hands.

For a few years, I had all that with my miGo Senja mug.  I loved that it had a blue lid and handle...I could easily identify my cup when I left it in the break room.  When the lid broke I searched high and low to find the same cup.  While Aladdin (who makes the miGo line) still makes some of the miGo products, this particular cup is no longer available.  Bummer.

EXCELSTEEL 116 DOUBLE WALL MUG
ExcelSteel     
So I looked at Target, Waldemart (the store that shall not be named), Fred Meyer.  I scoured Amazon, reading reviews.  On Amazon I found this cup, the ExcelSteel 116 Double Wall Stainless Coffee Mug with Silicon Handle, which looked identical to my miGo cup. It wasn't made by the same company, but I still had high hopes....they were quickly dashed.  The splash guard that covers the lid's openings just spun around, never clicking in place.  The drink holes were at awkward angles, making me twist the cup in a weird way to sip my drink.  One day I accidentally left this cup behind.  I knew as soon as I'd left that I'd left it behind.  I didn't go back for it.
  • stainless steel ✓
  • handle ✓
  • no-dribbles down my shirt ✓
  • easily sip from either side  FAIL
  • temperature control SO-SO
  • fits in car's cup holders ✓
  • lightweight ✓
  • comfortable to hold ✓
Aladdin Hybrid
ALADDIN 16-OUNCE HYBRID TRAVEL MUG
So my search continued.  Since I'd been happy with my Aladdin product, I picked up the "Aladdin 16-Ounce Hybrid Travel Mug at a local store.  After a few days of liquid dribbling down my shirt, I retired the cup and started scouring Amazon again. 
  • stainless steel ✓
  • handle ✓
  • no-dribbles down my shirt FAIL
  • easily sip from either side  ✓
  • temperature control SO-SO
  • fits in car's cup holders ✓
  • lightweight ✓
  • comfortable to hold SO-SO


THERMOS SIPP 16-OUNCE VACUUM INSULATED TRAVEL MUG
Thermos Sipp
As I was reading the reviews I spotted a mug that I hadn't noticed before:  the Thermos Sipp 16-Ounce Vacuum  Insulated Travel Mug.  The reviews were great...I even read some from former miGo fans who were also on the hunt for the perfect replacement mug.  Let me just say...I was (and am) quite impressed.  This is a darn good mug.
  • stainless steel ✓
  • handle ✓
  • no-dribbles down my shirt  ✓ but....DEPENDS ON HOW IT'S FILLED
  • easily sip from either side  ✓
  • temperature control ✓  EXCELLENT
  • fits in car's cup holders ✓
  • lightweight NOT SO MUCH
  • comfortable to hold SO-SO 
The best part of this mug, is that if you fill it properly, and push down the center lid button, it seals it.  You can hold it upside down without a drop leaking.  BUT...you have to make sure to only fill it to the lowest line inside the mug before screwing on the lid.  If you do that, you're good.  Anytime I fill it above the line I have issues of liquid seeping out between the cup and the lid.  But this is easily avoidable.   

This mug keeps cold drinks cold, and hot drinks hot.  Not lukewarm...HOT.  I have left it out overnight, and the next morning, there were still large ice cube chunks left in the cup.  When I put ice in a mug, it usually melts within an hour or two.  Not with this mug.

But, in order to have the vacuum insulated system, the lid is bulky and heavy, adding some heft to the mug.   This mug is definitely a keeper, but I'm not sure it will be my daily mug.  My hands are arthritic and the weight is an issue.  Bummer, because it's a DARN GOOD MUG.

ALADDIN SENJA TRAVEL MUG
****Aladdin Senja****
As I was using my Thermos Sipp mug, somehow I stumbled across the Aladdin Senja Travel Mug.  Hmmmm....it looks just like the miGo cup.  It's made by the same parent company.  Could it be that I'd found my mug again???!!!  Still mostly happy with the Sipp mug, I up and bought the Aladdin Senja.  I was wary after reading the reviews.  Many were happy.  But there were some miGo lovers who said that this mug didn't hold a candle to the miGo one.  Skeptically I bought it and have been using it for a week now.  The only thing that comes to my mind is........YESSSSSSSSSSS!!!!!!   FINALLY!!!!!!!!!!!!!!!  SO GLAD TO HAVE YOU BACK IN MY LIFE!!!!

I don't notice any differences between this mug and the miGo one.  I'm a happy girl.
  • stainless steel ✓
  • handle ✓
  • no-dribbles down my shirt  ✓
  • easily sip from either side  ✓
  • temperature control SO-SO
  • fits in car's cup holders ✓
  • lightweight ✓
  • comfortable to hold ✓


Thursday, January 26, 2012

Gardening Inspiration From Pinterest

Pin It
January in the Pacific Northwest is dreary.  We have rain for days and weeks on end, gloomy grey skies, and we tend to hole up inside the house.  Not much gets done on the yard.  The weeds are growing...oh, my!  The dried up perennials that should have been trimmed in fall, are, well, still needing a trim.  The now-shady yard that used to be sunny still needs a total overhaul.   And the grass (or is it mostly weeds by now??) in back also probably needs a total overhaul.  It's patchy with divots and holes.  

I really should get out there and at least work on it 20 minutes a day.  Perhaps that will be my goal for February.  Other than the patchy grass, I could make a SERIOUS dent in my yard work if I would only get out there for 20 minutes a day. As I'm writing this, that little voice inside my head is screaming, "SO DO IT!  MAKE A COMMITMENT AND GET OUT THERE!"  OK, I will.  20 minutes a day...10 in front; 10 in back.  When those spring bulbs start popping out of the ground, they won't be surrounded by autumn's mess.

So, what have I been doing with the yard?  Scanning Pinterest, of course, for inspiration!  Here are some of the things I'd like to incorporate in my yard this year:

Love, love, love!  I've tried so many kinds of garden markers.  I just adore these.  Source
I love the wire arch that goes over a path between two garden beds.  I might be able to do this in my front, side yard, but I think it would be too busy.  Another, even better, spot could be in the back corner of the yard, where I compost.  Hmmm...ideas!!  Source
Hanging lavender to dry.  Great way to dress up a gate too.  Source
I have a dozen or so of these short shepherd's hooks, and I have a gazillion mason jars.  Oh, yes, I most definitely have hydrangeas!  I will be doing this the next time I entertain.  Source
Attach a mailbox to the raised beds for garden tool storage.  YES!  My raised beds would love to have their own little trowels, twine, and pruners stored nearby.   Source.

I love this cucumber trellis that shades lettuce.   Source.


Tuesday, January 24, 2012

Red Velvet Cake

Pin It Red Velvet Cake (aka Brian's Red Cake)

The first time I made this recipe was when I was in college.  I was dating my now-husband, Brian.  I'm pretty sure it was November 11, 1988, because  I made it with his sister, Sheila, for his 22nd birthday.  We surprised him with it in the middle of the night...at the actual time of his birth.  In hindsight, that wasn't the smartest thing to do.  But he still married me!

The recipe is an old family original, that has been in his family for several generations.   However, when I say "original" you'll see that there's really nothing original about it.  As I searched through many online versions of Red Velvet cake, it's a pretty typical recipe.  In fact, there are near identical ones to it all over the place.  When looking at all the recipes, there was a wide discrepancy regarding the amount of cocoa to use.  Some (like this one) use just a couple teaspoons.  Others use up to a quarter cup.  Though I've tasted many over the years, I stick with making this one, because 1) it's darn good. And, 2) it has a history.

Before 1988, I don't think I'd ever heard of, nor tasted, a Red Velvet cake.  I'm thinking that like all classics, it was experiencing a lull, only to be fully revived by a new generation.  In fact, for years, I called it "Brian's Red Cake" not even knowing that it was a Red Velvet cake.  Silly girl.

Brian's Red Cake

Combine and let stand:
     1 tsp baking soda
     1 tsp vinegar

Cream:
     1 1/2 C sugar
     1/2 C shortening
     2 eggs

Mix in a small, separate bowl.  Then add to the sugar mixture:
     2 tsp cocoa
     2 1/2 C cake flour
     1 tsp salt

Add:
     1 tsp vanilla

Mix in the baking soda/vinegar.
Pour into 2 9" pans.
Bake for 30 minutes in a 350 degree oven.
Top with cream cheese frosting.

Cream Cheese Frosting

Blend well:
8 oz softened cream cheese
4 TB softened (NOT melted) butter
2 C powdered sugar
1 tsp real vanilla extract
1/2 tsp lemon extract


How to Compost the Easy Way

Pin It
A couple years ago, we started composting our yard waste.  Why we waited so long is a mystery.  OK, not really.  I didn't have the room.  When we moved our fence back 3', that left a weird space (4' x 12') behind the shed in a corner of the yard.  We could've moved the shed back up against the new fence, but that would've taken a ton of work.  Instead I claimed the space as my new composting area!


Back behind the shed, I can fit three composting bins, and a workbench (old desk from the Habitat Restore).  I also can stash buckets, bins, and my annual supply of sunflower stems.  I had a small stash of paving stones leftover from our patio, and made a nice little path back to and through the compost area.  These are slightly raised so I have a non-muddy stepping spot during the fall-winter-spring rains.  
For years I was intimidated by composting.  I'd read that you needed to have a specific ratio of materials with carbon and nitrogen.  You had to turn it.  You needed nitrogen boosters.  You should get a fancy (and expensive) tumbler.  Or you needed to be handy and build a three step wooden structure.  Or you had to dig underground and bury it.  And then it had to be far away from the house (smells), yet close enough that you actually used it.  Oh, and then sometimes rodents would be attracted and build a nest there.  No wonder I put off composting for so long.

But once we moved the fence over, I decided to just go for it.  I started off by reading Let It Rot:  The Gardener's Guide to Composting.  With thorough lists of what to compost and what not to compost, nitrogen and carbon levels, and an overview of several composting methods, I felt confident enough to start. 

I thought I would choose a barrel that tumbled. But when I looked at the cost (usually well over $100 each), the amount they held, and the space they took up, they were less appealing. Plus, at one of the local gardening centers I learned that they're not as effective in the Pacific Northwest.  For at least 2/3 of the year our garden waste is wet.  The tumblers, they said, just tossed a big wet lump from side to side, not really mixing it up well.  Another reason to save my money.

On its way!
I looked around at garden centers, big box stores, and also at our local compost provider, Greenlands.  What appealed to me most was the Earth Machine.  I found it at one farm store for about $90, and half the price ($45) at Greenlands.  Supposedly, they sell them at cost to encourage composting.  I started with one and quickly got a second.  15 months later  I purchased my third.  And, truth be told, I could easily use a fourth!

At first I followed the composting rules precisely...making sure I had 2/3 brown (carbon) material to 1/3 green (nitrogen) material.   I also was good about removing the Earth Machine container to another spot, and regularly using a pitchfork to mix it up before putting it back in the container.  I kept it wet, but not too wet.  I checked the internal temperature to make sure it was cooking.  Yeah, I was the model composter.
Compost after 6 mos.

Then life got in the way, and I became more of a composting slacker.  Would I ever get "black gold" this way?  I wondered.

Then my friend, Margy, the gardening guru, set my mind at ease.  Margy's a seasoned composter who really doesn't follow all the rules.  She puts it all in a heap, and simply lets nature take care of the rest.  Margy's advice was that "eventually it will all decompose".  Whenever I worry about the right mixture, whether it's wet enough (or too wet), whether I've stirred it enough...I let Margy's words come into my head.  It might take longer, but it really will rot on its own.

Some tips I've learned after two years of semi lazy composting:

  1. While I'm not nitpicky about the perfect carbon/nitrogen ratios, I do know th
    Leaf bag
    at I don't have a lot of carbon materials available in the winter/spring.  To help balance the compost during these months, I have a dry leaf stash in my shed.  During the fall I collect leaves and store them in holey trash bags.  I use the same bags year after year.  I make sure the leaves are completely dry before putting collecting them, and then make sure the bags have plenty of air holes.  This way, I always have plenty of great carbon around.
  2. I also keep a stash of cardboard boxes by my compost bins.  I've removed labels, tape, and staples.  Rather than recycle, I rip them up a bit and add them to the compost as well.
  3. I don't add anything with grease, meat, or bread.  That cuts down on attracting a rodent population.  I'm not fond of rodents and in two years have never had a problem. 
  4. Sunflower stalks are excellent aerators.  As my flowers fade, I colle
    Sunflower stalks used to aerate the center of the compost pile
    ct every single stalk in a couple 5-10 gallon plastic plant containers (which have drainage holes).  As I'm building my compost pile, I push the stalks down through the compost.  The stalks dry easily and hollow out, allowing air to flow within the pile.  I can never have enough sunflower stalks!
  5. I stopped worrying about having perfect, non-lumpy compost.  Who cares if it has a few twiggy elements in it?  I could sift those out or wait a bit longer for them to decompose...but I choose not to.  I just use it when it's good enough.
  6. Kitchen compost container
  7. While I'm not that picky, I've found that extra woody-twiggy plants take too long to decompose.  Examples of this would be many herbs (such as rosemary and oregano).  I also don't compost rose branches because the thorns don't break down.  The woody/thorny plants go into our yard waste container. 
  8. I choose to use a stainless steel kitchen container instead of a ceramic one.  When I'm bringing my compost from the kitchen to the outdoors, I'm not always gentle with it.  I want something light and I don't have to worry about chipping or cracking.  I wash out my container every single time.  I used to use the carbon filters, but find that if I'm emptying it regularly (every few days), I don't need the filters.
If you've been putting off composting because you don't know how, remember Margy's words:  "Eventually it will all decompose."  So, what's stopping you now??